
The easiest way to install OctoPrint is by utilizing the Raspberry Pi Imager:
Here are the basic steps:
- Download and install the Raspberry Pi Imager from the Raspberry Pi Foundation.
- Insert your SD card into your computer or connect it using an adapter. There’s no need to format the SD card prior to this as the tool will take care of that for you.
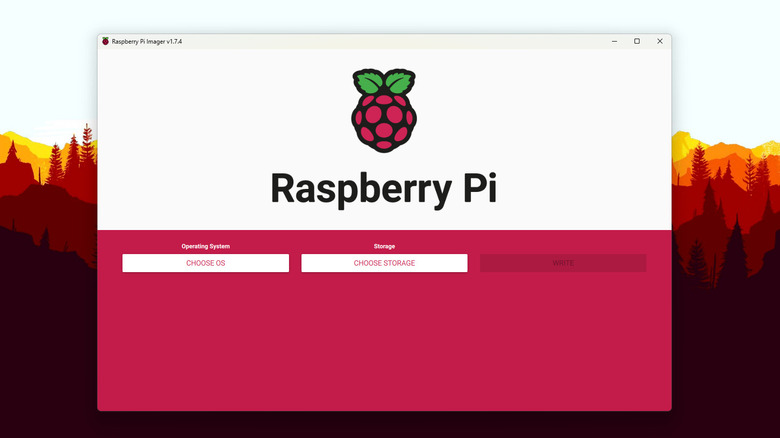
- Open the Raspberry Pi Imager and click on “Choose OS” under “Operating Systems”.
- Then go to “Other specific-purpose OS > 3D printing > OctoPi”. The current version should be available. At the time of writing this, it was OctoPi 1.8.7.
- Next, choose your storage option. Make sure to select the correct SDCard as it will be wiped to install OctoPi.
- Click on the gear button in the bottom-right corner to open the “Advanced Options”.
- Add a system password under “Set username and password”. Make sure to keep the same username “pi” as this username and password are only for SHH connection, not for logging in to OctoPrint. If you plan to use OctoDash, and change the Pi’s Username, you will have to update the OctoPrint or Oprint filepath during the installation.
- Next, you can add the Wi-Fi settings for the Raspberry Pi. Click on the “Configure wireless LAN” checkbox and enter your network SSID and password. Here you can also set location and timezone, then Click “Save”.
- Once back to the main menu, click “Write” and the Raspberry Pi Imager will download and install the OctoPrint image.
- Once installed, the software will run a quick verification and then prompt you that it has been completed. Place the SD card in your Rasberry Pi and boot.
Next, we will install OctoDash. For some reason, OctoDash likes to be installed before installing the TFT Screen drivers.
Installing OctoDash, run the following script.
bash <(wget -qO- https://github.com/UnchartedBull/OctoDash/raw/main/scripts/install.sh)
Depending on the TFT Touch Screen you’re using, you may get an XINIT error. https://github.com/UnchartedBull/OctoDash/wiki/Troubleshooting can assist in solving this error. Each screen requires different drivers.
After installing OctoDash, SSH into the Pi and run Sudo Raspi-Config:
Go to System Options

Boot / Auto Login

Console Autologin
This is so OctoDash starts automatically upon booting your Raspberry Pi.

Next, go to Interface Options > Enable VNC > Yes > Reboot


Setting up the TFT Screen:
sudo rm -rf LCD-show
git clone https://github.com/goodtft/LCD-show.git
chmod -R 755 LCD-show
cd LCD-show/
sudo ./LCD35-show
Once you get the LCD Screen working, your Pi should reboot and automatically display OctoDash. Once you select “Begin”, you will be prompted to enter you OctoPrint API Key.
Go to https://www.realvnc.com/en/connect/download/viewer/ and download VNC Viewer.
Use VNC Viewer to connect to your Raspberry Pi so that you can copy and paste your OctoPrint API key. Otherwise, you must type it in from the LCD touch screens on-screen keyboard.

The OctoPrint API key can be found in OctoPrint Settings > API.
Setting up the Logitech C920 USB Webcam:
Once OctoPi’s up and running, it’s time to move to the webcam. Here’s how to configure OctoPrint to use the correct settings for your webcam.
- Shutdown your Raspberry Pi, remove your SD card and place it in your computer.
- In the boot partition, locate a file named “octopi.txt” and open it using a text editor such as Notepad++.
- After opening the file, uncomment the line camera_usb_options=”-r 640×480 -f 15″ by removing the ‘#’.
- Replace the “-r 640×480 -f 15” with the settings that are specific to your webcam model. You can look at the settings in the OctoPrint camera guide. For my Logitech C920, the settings were “-r 1920×1080 -f 30”
- Uncomment the lines at the bottom of “octopi.txt” file by removing the ‘#’ and edit them to read as follows: camera_http_webroot=”./www” and camera_http_options=””.
- Insert the SD card back into the Raspberry Pi and connect the webcam to it. Once you’re through the setup process, you can see the webcam feed under the Control tab of OctoPrint GUI.
