I am constantly reading forums and fielding questions on my site related to all aspects of 3D printing. Most of the questions are from people just venturing into the world of consumer, at-home printing with Fused Deposition Modeling (FDM) machines. Questions range from how to get the machine to work, to print quality troubleshooting, and everything in between.
Even though I have been printing for years, I still run into issues when trying a new technique or approach. For example, what is the best infill pattern? Gyroid, cubic, honeycomb? Infill pattern and percentage (density) refer to the inside “fill” of a print. They provide structure and rigidity to a print while lessening the weight and eliminating wasted material.
After running various test prints, all with different patterns, I discovered there’s really no “best” style when it comes to infill. But there is an ideal pattern for specific scenarios.
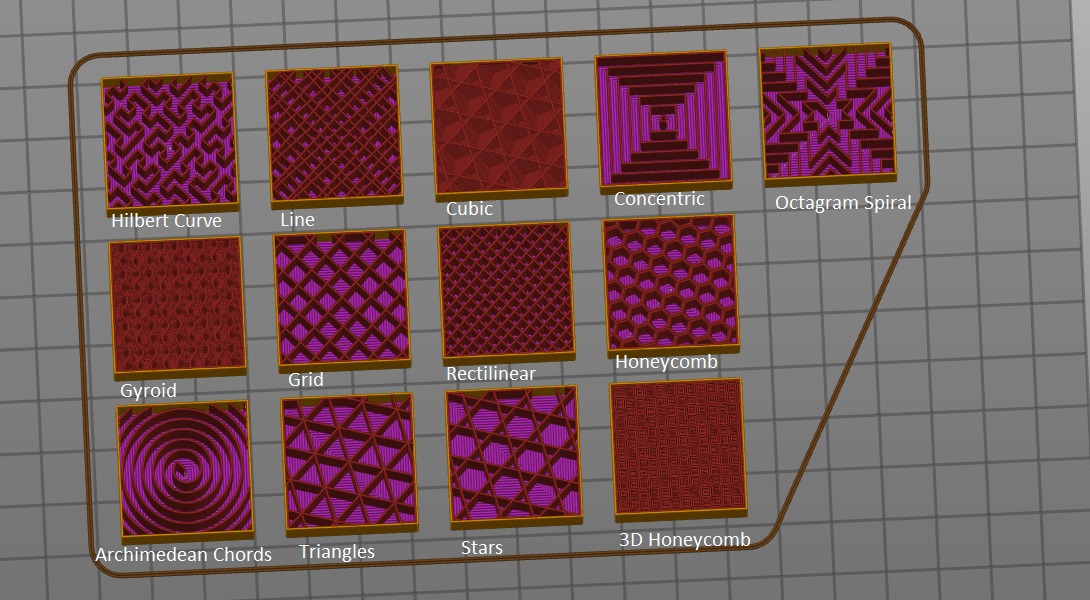
Let’s explore. Just like infill patterns (Prusaslicer 2.2 is up to 13 variations these days), a plethora of filament types also exists. Depending on your print design’s intended use or function, and the filament you’ve selected, the infill pattern and density should be carefully considered.
I’ve also found that print strength often has more to do with perimeter shells than infill. Granted, infill definitely provides strength but usually it offers compression strength and stops short at straight-breaking strength. I have had several models with strong infill but only one or two shells that simply snap in half. Bad layer adhesion can also be a factor.
I mentioned earlier Prusaslicer 2.2 currently has 13 pattern types. Most people in the 3D community agree that each pattern fits into its own category like low, medium, or high strength, as well as flexibility. Pattern selection should be prioritized by the following considerations: print speed, density, visual interest, top layer support and flexibility. Keep in mind that strong can sometimes mean flexible.
What are my top picks for infill?
Gyroid is my personal favorite because it’s one of the most versatile. Why?
- Three-dimnsional design provides strength in all directions, it’s Isotropic!
- Can be printed fast.
- Uses less material so it’s lighter and less expensive.
- Visually appealing and can often be seen through a single shell.
There are a couple of cons to this style of infill though. When Gyroid is at the higher infill percentages, over 20%, it can increase printer vibrations. It is also slower to slice. I have not found either to be an issue as I rarely print higher than 5-10% infill and honestly, slicing times just don’t matter to me!
I also really like 3D Honeycomb for the simple fact that it looks cool. During test prints it seems to provide excellent strength while still allowing some flexibility. I have also noticed it can sometimes reduce warping.
The third infill pattern I use often is Cubic. I use this pattern when I need stronger prints with higher fill density, usually anything above 40%. There is another variation called Cubic Subdivision available in Cura that is very similar, albeit not as strong, but uses less material.
2D Patterns
Grid, triangles, lines and stars are 2D infills that work well for basic prints where you want to save on filament, print quickly, and may not care about strength.
Infill patterns where flexibility is required
The remaining infills I rarely use are concentric, archimedean chords, hilbert curve and octagram spiral, which all have their uses especially when printing with TPU or another flexible material.
All patterns, like filament types, have their pros and cons. They all can be useful in producing successful prints. When printing downloaded STL files, don’t forget about infill patterns when looking for that perfect print. Often people focus on the easy things like temperature, speed, bed leveling or bed type and ignore infill completely.
Infill will also make designing and printing your own models easier for you and others should you choose to share.
Thanks and happy printing!


